Submit and install a private app in Freshdesk
 Updated
by
Kelly watts
Updated
by
Kelly watts
To submit a Custom app:
- Log into your Freshdesk account and from the left-navigation pane, select the Admin icon. The Admin page is displayed.
- Navigate to General Settings > Security and ensure that the Secure Connection using SSL toggle is selected.
- Navigate to the Freshdesk developer website and click Log in. The Login with your Freshdesk account window is displayed.
- Enter your Freshdesk account URL (for example, myhelpdesk.freshdesk.com) and click PROCEED. If you are not signed in to your Freshdesk account, the login page is displayed. Enter your Freshdesk account credentials and click LOGIN. The freshworks developer page is displayed.
- Click Add New App. The Add New App window is displayed.
- Click Custom App. The Custom App window is displayed.
- Click Upload app file, select the provided zip file, and click Open. The My New App page is displayed.
- Under the App Details tab, provide appropriate information by using the following fields.
Note: As custom apps are not subject to the app review process, you can choose not to upload an app specification/demo video or enter an alternate email address.FIELD
TASK
For Product
Select freshdesk.
App Name
MandatoryEnter a name for the app, comprising two to three words.
IntegrateCloud-DevOps Integration
Overview
MandatoryEnter an introduction to the app, not exceeding 100 characters.
Description
MandatoryEnter a description of the app’s functionality and features.
Instructions
If specific user actions are required when the app is installed, in this field enter the corresponding instructions as a sequential list.
App Icon
Upload an icon to represent the app. Ensure that the logo meets the following requirements:
Screenshots
Upload screenshots to illustrate how the app works. Capture different states and process flows to give users a better insight into the app. You can upload a maximum of five screenshots. Ensure that the screenshots meet the following requirements:
App Category
Select the appropriate category to help users filter and find the app. You can select a maximum of two categories.
App Specification/Demo Video
Enter the URL to the app's specification document or demo video, to help app reviewers understand the app's basic functionality.
Support Email
MandatoryEnter the email address that users can use to contact you in case of any queries regarding the app.
Support URL
Enter the URL to any location where users can find more information about the app.
Alternate Email
Enter the email address that Freshworks can use to contact you, when the app is under review.
- To replace the uploaded app file, in the Development Version widget, click Replace File, select a new packed app file, and click Open.
- Click Publish, to submit the app. The label of the Publish button changes to Publishing In Progress. Custom apps are not subject to the review process and are available for installation within 30 minutes of app submission. If you update the app and republish it, the changes are deployed within 30 minutes. After the app is successfully added or updated, the label of the button changes to Publish.
- To verify the status of a custom app:
- From the Apps drop-down list, select My Apps. The My Apps page is displayed with a list of all apps published from your Freshdesk account. Custom apps are displayed as a card with a lock icon.
- Hover the cursor over the corresponding custom app card. If the custom app is successfully published, the card’s status is displayed as INTERNALLY PUBLISHED.
To install a custom app:
- Log into your Freshdesk account and from the left-navigation pane, select the Admin icon. The Admin page is displayed.
- Navigate to Helpdesk Productivity > Apps. The Apps page is displayed.
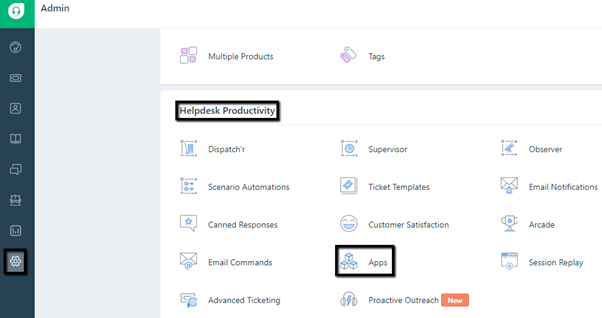
- Navigate to the Custom Apps tab and Click Get Custom Apps. The Custom App Gallery window is displayed with a list of all custom apps that are successfully published.

- Click on the card corresponding to the app that is to be installed. The app details are displayed.
- Click Install.
- If the app requires third-party authentication, a corresponding window requesting for login credentials is displayed. Enter appropriate credentials and log in. The Authorize app window is displayed. Click Authorize.
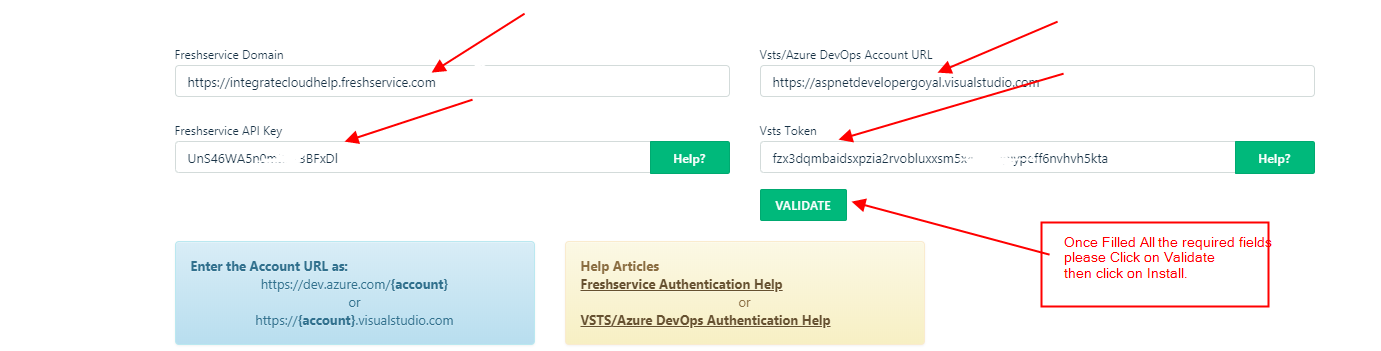
- If the app requires input in the form of installation parameters, the Settings page is displayed with the list of installation parameters. Enter appropriate input values and click Install.